Each object has a To Do List where you specify what you want to happen as soon as an event occurs for that selected object. The To Do List is available via a tab in the Object Editor. To open it, right click on an object and choose To Do List... from the popup menu.
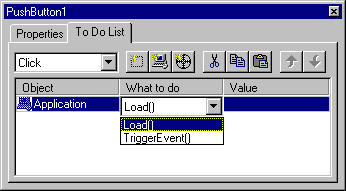
The following figure shows an example of how the empty To Do List initially appears for a Push Button object (called PushButton1).
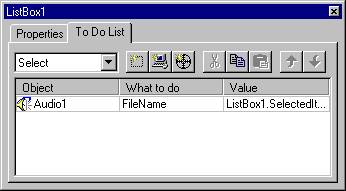
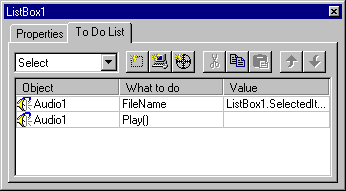
You can enter as many items as you want in the To Do list. For example, you can set it up so that when a user clicks on a Push Button the following actions occur:
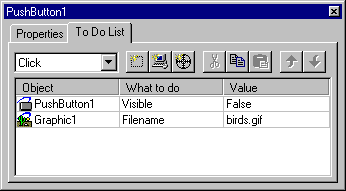
The To Do list for this scenario would appear similar to the following:
The event list (in the top left corner) is set to Click. This means that any actions that are in the To Do List will occur when the user clicks on PushButton1. The first line in the To Do list specifies that PushButton1's Visible property will be set to False. The second line specifies that Graphic1's Filename property will be set to birds.gif.
You can set actions for any object or for the overall application. The following subsections describe how to set up the To Do list.
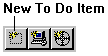
As soon as you click on the New To Do Item button, a new line is added to the To Do List and a drop-down list of all the objects on the page appears in the Object column. The following figure shows an example of how the To Do list appears if you click on this button.
If you don't know the precise name of the object you want to add to the Object list, click and hold down the Find Object button. The cursor becomes a cross-hairs. While still holding the mouse button down, drag the cross-hairs over the objects in the Page Layout Editor. The selected object's name appears in the Object column field.
The name of the object is added to the Object field when you release the mouse. Hint: You can also drag the button over the Object List in the Page Layout Editor.
5. Use the open list to select the object you want to add as a To Do List item.
When you select the object, the What To Do field automatically displays a list of the actions that are available for the selected object. There are two basic types of actions: properties and methods. Properties, as described earlier in this chapter, let you set basic characteristics of an object. For example, the Label property of a Push Button lets you set up the object's text label. Methods are special actions that command an object to do something, such as play an audio file.
6. Select the desired property or method from the What to Do list.
7. As necessary, set the Value field for the To Do List item.
Often, properties require a value and methods do not. For example, if you are setting a Push Button's Visible property, you must set the Value field to True or False. However, if you are setting an Audio object's Play method, you are simply directing the object to play. You do not need to specify a value.
Quick Helpers versus Typing
If the field requires a string, you can simply type it. However, many fields use Quick Helpers (specialized dialog boxes) to let you select values quickly and easily without typing. For example, if you click in the Value field of a Filename property an Open dialog box automatically appears to let you search for the desired filename.
If you need to type a value rather than select it from a Quick Helper, you can override the Quick Helper feature or turn it off. To override the feature, right click in the Value field and choose Edit Value from the popup menu. To turn off the Quick Helpers option, right click in the Object Editor and deselect the Quick Helpers command. Note that even when Quick Helpers are turned off, you still have the option of accessing the helper tools by clicking on a button that becomes available in the Value field.
When you finish selecting a value in a Quick Helper dialog box, you click on OK and the information is returned to the Value field. Note that if the selected value is a filename, the file is automatically copied to the correct project subdirectory if it is located elsewhere on your system.
The tool that lets you search for a filename is just an example of the many kinds of tools that let you set properties. Other examples are the Color dialog box that lets you select a color value and a Font dialog box that lets you select a font value. If you need assistance in using any of the tools that appear, refer to Appendix A for information on how to use the dialog boxes that are commonly found throughout Jamba.
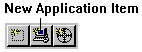
As soon as you click on the New Application Item button, two things occur. First, a new line that contains the value Application is added to the To Do List. Second, the list of available actions automatically opens in the What to Do field. The following figure shows how the To Do list appears if you click on this button.
5. Select the desired method from the What To Do list.
6. As necessary, set the Value field for the To Do List item.
To set a property to a value that originates from a user's interaction, type that value using the following syntax:
Object.Property
where:
Object is the name of the object the user affected.
Property is the name of the property (of the affected object) that contains the value to be used.
Important: By default, you may not be able to type in some Value fields because the Quick Helpers option is in effect. When you click in some Value fields a Quick Helper tool (such as the Color dialog box) appears automatically, preventing you from typing. To circumvent this feature, right click in the desired Value field and choose Edit Value from the popup menu. This places a typing cursor in the field. Or, you can turn off the Quick Helpers option by right clicking in the Object Editor and deselecting the Quick Helpers option.
The next section provides a brief lesson that demonstrates how to specify user-defined values.